Managing Products Inventory
Last Update: 10-10-20231. Adding Products
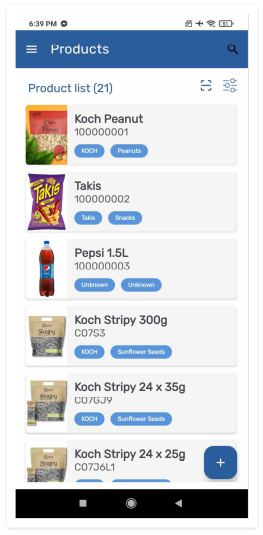
-- Navigate to the "Products" section.
-- Tap "Add Product" to include new items in your inventory.
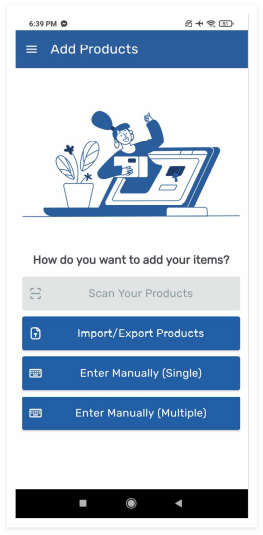
Choose Entry Method
You will be prompted to choose how you want to add products. Options include:
-- Import/Export via Excel: If you have product information in an Excel file.
-- Single Item Manual Entry: For adding one item at a time.
-- Multiple Items Manual Entry: For adding multiple items simultaneously.
2. How to Import/Export Products via Excel
Select Import/Export Option
-- If you choose to import/export products via Excel, select this option.
-- The application may provide a file upload interface.
Prepare Excel File
-- Download Excel file template and enter product details such as name, description, price, and quantity, etc.
-- Follow the application's format guidelines for a smooth import process.
Upload Excel File
-- Use the application's interface to upload the prepared Excel file.
-- Prepare image files in .zip folder and continue to upload.
-- Confirm and review the imported data before finalizing the process.
-- “Select Upload Files”
3. How to Do Single Item Manual Entry
Select Single Item Manual Entry
(If you are adding a single item manually, choose this option.)
Enter Product Details
-- Choose between “Quick Add” option and “Detailed” option.
Quick Add option
-- Fill in the required fields such as product name, barcode number, selling price, VAT inclusion percentage, and quantity.
-- To proceed with adding the new product, select “Add New Product”.
-- Add any additional details necessary for your inventory management can be added or edited once the product is existing in the inventory.
Detailed Option
-- Fill in the required fields such as product image, product code, product name, product short name(if any), product description, VAT inclusion percentage, category, brand, unit assignment(per unit, per weight, or mixed), selling price and quantity.
Save the Entry
Once all details are entered, save the entry to include the product in your inventory.
4. How to Do Multiple Items Manual Entry
Select Multiple Items Manual Entry
-- If you are adding multiple items manually, select this option.
-- Enter the barcode or use the scanner to quickly enter barcode for each item or product.
For each item entered, tap on any to view and edit product details
-- Enter the details for each item in the provided fields. This may include barcode number, product name, description, brand, category, unit, selling price, VAT and quantity.
Save Entries
Save all entries to include multiple products in your inventory simultaneously.
5. Editing Existing Products
Navigate to the "Products" Section
-- Find the product you want to edit in the product list.
-- Tap on the product to open its details.
-- Select “Edit Product” to initiate edit.
-- Modify the necessary fields, such as name, description, price, or quantity. etc.
-- Save the changes to update the product information in your inventory.
6. Product Packing
Choose Packing Type
-- Identify the options for different packing types, such as "Per Unit," "Per Weight," and "Mixed."
Per Unit Packing
-- In the context of product packing, "Per Unit" refers to a packaging and selling strategy where products are individually counted and sold as single items or specified units. Each item is treated as a separate entity, and the price is associated with one unit of the product. This packing type is common for items that are typically sold as discrete entities, such as canned food, condiments, or beverages. The quantity is determined by the number of individual items, regardless of their weight.
Example:
Selling canned goods, where each unit corresponds to one can.
Selling beverages, where each unit corresponds to one bottle of soda or water.
Enable Per Unit Packing
-- If your products are typically sold per unit, enable the "Per Unit" packing option.
-- Specify the default unit for each product, such as pieces, boxes, or any other applicable unit.
Per Weight Packing
-- "Per Weight" packing involves selling products based on their weight rather than a fixed unit. In this packing type, the price is determined by the weight of the product. This method is often used for items like fresh produce, meat, or bulk goods where customers are charged based on the actual weight of the product. The quantity purchased is measured in terms of weight units (e.g., grams, kilograms, pounds).
Example:
Selling fruits like apples or bananas, where the price is calculated based on the weight.
Selling meat at a deli counter, where the customer pays for the weight of the meat.
Enable Per Weight Packing
-- If your products are sold by weight, enable the "Per Weight" packing option.
-- Specify the unit of weight (e.g., grams, kilograms) and define the default weight for each product.
Mixed Packing
"Mixed" packing allows for a combination of both "Per Unit" and "Per Weight" options within the same inventory. This is useful when a business sells products that can be offered in different packaging formats. Some items may be sold individually (per unit), while others are sold based on their weight. This flexible approach caters to a variety of products within the same inventory.
Example:
Selling beverages where some are sold by the bottle (per unit) and others are sold by weight (e.g., bulk coffee beans).
Selling a variety of items in a grocery store where some are individually priced, and others are priced per weight.
Enable Mixed Packing
-- If your inventory includes products with both unit and weight variations, enable the "Mixed" packing option.
-- Specify default units and weights for products that can be sold in both formats.
7. Apply to Existing Products
Update Existing Product Information
-- If you are introducing or modifying packing options for existing products, update the product information accordingly.
-- Ensure that each product is assigned the correct packing type, unit, and weight information.
-- Once you've configured the product packing settings, look for a "Save" or "Apply Changes" button.
-- Click or tap on the button to save your packing preferences.